第四章进入了窗体类的介绍,讲述了窗体的基本操作及如何定义一个窗体。
一、窗体类基本概念
对于WPF应用程序,在Visual Studio和Expression Blend中,自定义的窗体均继承System.Windows.Window类。用户通过窗口与 Windows Presentation Foundation (WPF) 独立应用程序进行交互。 窗口的主要用途是承载可视化数据并使用户可以与数据进行交互的内容。独立 WPF 应用程序使用 Window 类来提供它们自己的窗口。在 WPF 中,可以使用代码或 XAML 标记来实现窗口的外观和行为。我们这里定义的窗体也由这两部分组成:
1、 XAML文件,在这里面通常全部写UI的东西,包括窗口的外观,控件等。
<Window x:Class="WpfApp1.WindowThd"
        xmlns="http://schemas.microsoft.com/winfx/2006/xaml/presentation"
        xmlns:x="http://schemas.microsoft.com/winfx/2006/xaml"
        Title="WindowThd" Height="300" Width="400">
    <Grid>
        <StackPanel>
            <Label x:Name="lblHello">欢迎你光临WPF的世界!</Label>
            <Button Name="btnThd" Click="btnThd_Click" >多线程同步测试</Button>
            <Button Name="btnAppBeginInvoke" Click="btnAppBeginInvoke_Click" >BeginInvoke 异步调用</Button>
        </StackPanel>
    </Grid>
</Window>
2、窗口界面中的各种行为,则由后台代码文件决定。
using System;
using System.Collections.Generic;
using System.Linq;
using System.Text;
using System.Threading;
using System.Threading.Tasks;
using System.Windows;
using System.Windows.Controls;
using System.Windows.Data;
using System.Windows.Documents;
using System.Windows.Input;
using System.Windows.Media;
using System.Windows.Media.Imaging;
using System.Windows.Shapes;
using System.Windows.Threading;

namespace WpfApp1
{
    /// <summary>
    /// WindowThd.xaml 的交互逻辑
    /// </summary>
    public partial class WindowThd : Window
    {
        public WindowThd()
        {
            InitializeComponent();
        }

        private void ModifyUI()
        {
            // 模拟一些工作正在进行
            Thread.Sleep(TimeSpan.FromSeconds(2));
            //lblHello.Content = "欢迎你光临WPF的世界,Dispatcher";
            this.Dispatcher.Invoke(DispatcherPriority.Normal, (ThreadStart)delegate()
            {
                lblHello.Content = "欢迎你光临WPF的世界,Dispatche  同步方法 !!";
            });
        }

        private void btnThd_Click(object sender, RoutedEventArgs e)
        {
            Thread thread = new Thread(ModifyUI);
            thread.Start();
        }

        private void btnAppBeginInvoke_Click(object sender, RoutedEventArgs e)
        {
            new Thread(() =>
            {
                Application.Current.Dispatcher.BeginInvoke(DispatcherPriority.Normal,
                    new Action(() =>
                    {
                        Thread.Sleep(TimeSpan.FromSeconds(2));
                        this.lblHello.Content = "欢迎你光临WPF的世界,Dispatche 异步方法!!" + DateTime.Now.ToString();
                    }));
            }).Start();
        }
    }
}
二、窗体的生命周期
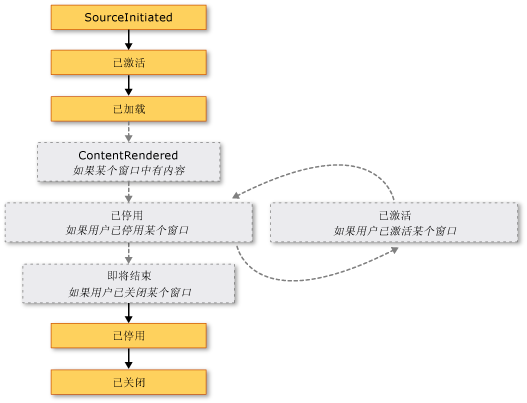
和所有类一样,窗口也有生存期,在第一次实例化窗口时生存期开始,然后就可以显示、激活和停用窗口,直到最终关闭窗口。
1、显示窗体
- 构造函数
- Show()、ShowDialog()方法:Show()方法显示非模态窗口,这意味着应用程序所运行的模式允许用户在同一个应用程序中激活其他窗口。ShowDialog()方法显示模态窗口,这个基本和WinForm类似
- 当初始化窗口时,将引发 SourceInitialized 事件并显示窗口。
2、窗体的激活
在首次打开一个窗口时,它便成为活动窗口(除非是在 ShowActivated 设置为 false 的情况下显示)。 活动窗口是当前正在捕获用户输入(例如,键击和鼠标单击)的窗口。 当窗口变为活动窗口时,它会引发 Activated 事件。
当第一次打开窗口时,只有在引发了 Activated 事件之后,才会引发 Loaded 和 ContentRendered 事件。 记住这一点,在引发 ContentRendered 时,便可认为窗口已打开。
窗口变为活动窗口之后,用户可以在同一个应用程序中激活其他窗口,还可以激活其他应用程序。 当这种情况出现时,当前的活动窗口将停用,并引发 Deactivated 事件。 同样,当用户选择当前停用的窗口时,该窗口会再次变成活动窗口并引发 Activated。
3、关闭窗体
当用户关闭窗口时,窗口的生命便开始走向终结。
- Close()方法:关闭窗体,并释放窗体的资源
- Closing事件、Closed事件:关闭时、关闭后引发的事件,通常在Closing事件中提示用户是否退出等信息。
4、窗体的生命周期
如下图。
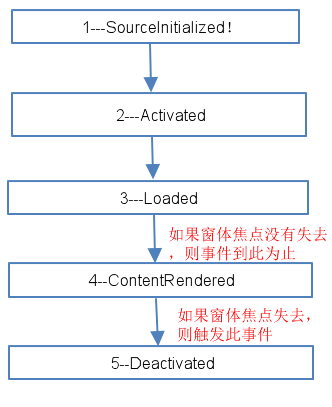
为了证实上面的结论,我们用下面的代码进行测试:
using System;
using System.Collections.Generic;
using System.Linq;
using System.Text;
using System.Threading;
using System.Threading.Tasks;
using System.Windows;
using System.Windows.Controls;
using System.Windows.Data;
using System.Windows.Documents;
using System.Windows.Input;
using System.Windows.Media;
using System.Windows.Media.Imaging;
using System.Windows.Shapes;
using System.Windows.Threading;

namespace WpfApp1
{
    /// <summary>
    /// WindowThd.xaml 的交互逻辑
    /// </summary>
    public partial class WindowThd : Window
    {
        public WindowThd()
        {
            this.Activated += WindowThd_Activated;
            this.Closing += WindowThd_Closing;
            this.ContentRendered += WindowThd_ContentRendered;
            this.Deactivated += WindowThd_Deactivated;
            this.Loaded += WindowThd_Loaded;
            this.Closed += WindowThd_Closed;
            this.Unloaded += WindowThd_Unloaded;
            this.SourceInitialized += WindowThd_SourceInitialized;
            InitializeComponent();
        }

        void WindowThd_SourceInitialized(object sender, EventArgs e)
        {
            Console.WriteLine("1---SourceInitialized!");
        }

        void WindowThd_Unloaded(object sender, RoutedEventArgs e)
        {
            Console.WriteLine("Unloaded!");
        }

        void WindowThd_Closed(object sender, EventArgs e)
        {
            Console.WriteLine("_Closed!");
        }

        void WindowThd_Loaded(object sender, RoutedEventArgs e)
        {
            Console.WriteLine("3---Loaded!");
        }

        void WindowThd_Deactivated(object sender, EventArgs e)
        {
            Console.WriteLine("Deactivated!");
        }

        void WindowThd_ContentRendered(object sender, EventArgs e)
        {
            Console.WriteLine("ContentRendered!");
        }

        void WindowThd_Closing(object sender, System.ComponentModel.CancelEventArgs e)
        {
            Console.WriteLine("---Closing!");
        }

        void WindowThd_Activated(object sender, EventArgs e)
        {
            Console.WriteLine("2---Activated!");
        }

        private void ModifyUI()
        {
            // 模拟一些工作正在进行
            Thread.Sleep(TimeSpan.FromSeconds(2));
            //lblHello.Content = "欢迎你光临WPF的世界,Dispatcher";
            this.Dispatcher.Invoke(DispatcherPriority.Normal, (ThreadStart)delegate()
            {
                lblHello.Content = "欢迎你光临WPF的世界,Dispatche  同步方法 !!";
            });
        }

        private void btnThd_Click(object sender, RoutedEventArgs e)
        {
            Thread thread = new Thread(ModifyUI);
            thread.Start();
        }

        private void btnAppBeginInvoke_Click(object sender, RoutedEventArgs e)
        {
            new Thread(() =>
            {
                Application.Current.Dispatcher.BeginInvoke(DispatcherPriority.Normal,
                    new Action(() =>
                    {
                        Thread.Sleep(TimeSpan.FromSeconds(2));
                        this.lblHello.Content = "欢迎你光临WPF的世界,Dispatche 异步方法!!" + DateTime.Now.ToString();

                    }));
            }).Start();
        }
    }
}
打开窗体的事件执行顺序为:如下图。
三、关闭窗体的事件执行顺序
如下图。

WPF窗体的详细的属性、方法、事件请参考MSDN,有很多的属性、方法、事件与Windows应用程序中 System.Windows.Forms.Form类颇为相似。
(本文转载自:http://www.cnblogs.com/chillsrc/)